Before we begin installing WordPress, you must have a few things. To begin, you will need a domain name and a hosting company for your website to be visible online. You must select the type of WordPress installation that best meets your requirements. Numerous methods use various software and platforms, such as cPanel, FTP with FileZilla, and MySQL. EasyWP is an optimized WordPress hosting option.
Users who want to take advantage of the platform’s famous five-minute installation should ensure that their host provides a solution like Softaculous. FTP or cPanel will be used for a manual installation. Users who want to create a test environment for WordPress will install it locally using WAMP or MAMP, or they will create a local server using Microsoft’s Visual Studio.
We’ll break it down into easy-to-follow steps so that even beginners can breeze through this process.
Preparing for WordPress Installation
Before we embark on our WordPress journey, you’ll need a couple of things in your toolbox:
1. Domain Name and Hosting
First, you’ll need a domain name (that’s your website’s address) and a hosting company to make your website accessible online. Without these, your site will be like a car without wheels – it won’t go anywhere.
2. Choose Your WordPress Flavor
Now, let’s decide how you want to install WordPress. There are different methods, and we’ll cover a few:
a. Quick and Easy – Softaculous
If you’re in a hurry and want the famous five-minute installation, Softaculous is your best buddy. Many hosting providers offer this one-click installation in cahoots with cPanel. It’s quick, it’s easy, and it’s hassle-free.
b. The Hands-On Approach – Manual Installation
Manual installation is the way to go for those who like to roll up their sleeves and get their hands dirty. It takes a bit more effort but gives you full control.
c. Creating a Local Playground
If you’re cautious and want to test things out before going live, you can set up a local server using tools like WAMP (for Windows) or MAMP (for Mac). This lets you tinker with WordPress without anyone else seeing your work-in-progress.

Installing WordPress Automatically
Let’s Go the Easy Route with Softaculous
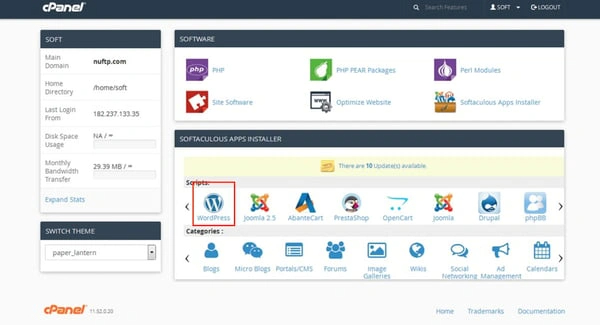
- Log into Your cPanel: The first stop is your hosting control panel. Log in and get comfy.
- Find Softaculous: Look for the Softaculous or WordPress installer icon in the Auto Installers section. Click it.
- Click the WordPress Logo: Well, that’s obvious, right? Click it.
- Hit Install: Now, it’s time to fill in the blanks for your WordPress installation. Choose your domain, specify the installation folder (it’s usually blank), and set up your site settings. Don’t forget to pick a secure table prefix!
- Click Install: Once everything looks good, hit that “Install” button, and let Softaculous work its magic. When it’s done, it’ll give you a pat on the back and hand you the keys to your site.
Installing WordPress Manually
For the DIY Enthusiasts
- Download WordPress: Head over to WordPress.org and get the latest version. Save it somewhere easy to find, like your desktop.
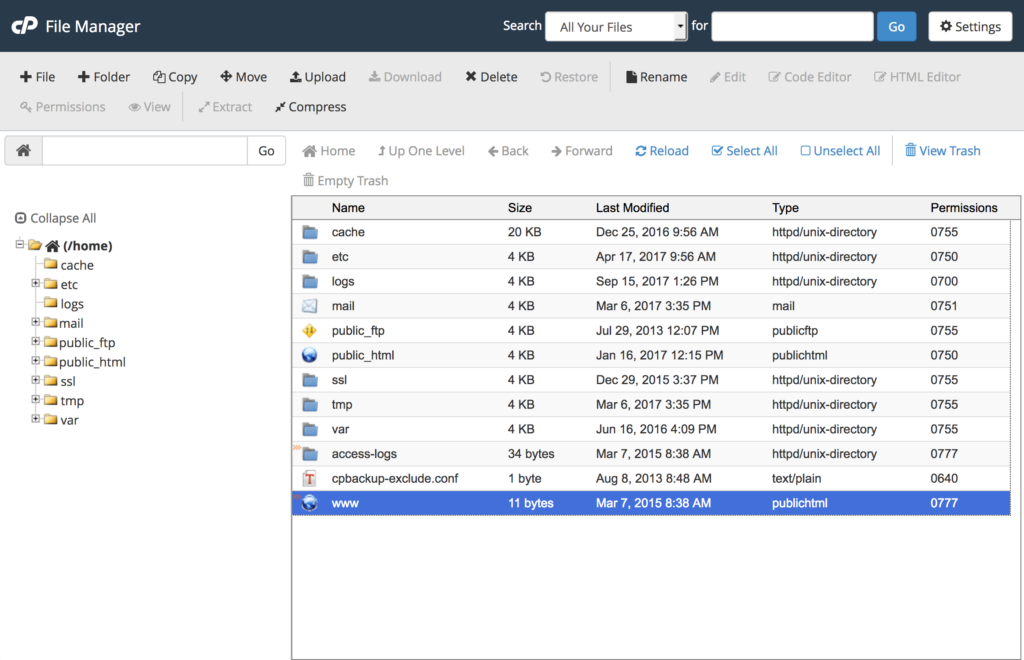
- Upload WordPress: There are two ways to do this: use an FTP client like Filezilla or use your hosting account’s File Manager. Both work fine, so pick your poison.
- Using FTP: If you go the FTP route, you’ll need software like FileZilla. Unzip your downloaded WordPress files, upload them to the right directory on your hosting account, and you’re ready.
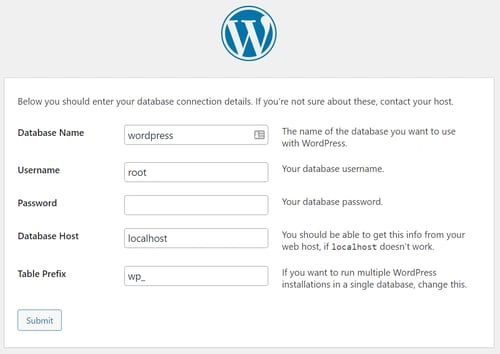
- Setting Up Your Database and Users: Before you dive into WordPress, create a new database in your hosting account. It’s like giving your website a place to store all its stuff. Note down the database name, username, and password – you’ll need these later.
- Install WordPress: Head to your website’s domain, and you’ll start the famous five-minute installation process. Choose your language, enter your database details, and set up your admin info! You’ve got WordPress installed.

Setting Up a Subdomain
Making Room for WordPress on Your Site
Maybe you want to add a WordPress blog to your existing website. No problem! Here’s how to create a subdomain:
- Log into cPanel: Once again, cPanel comes to the rescue.
- Select Subdomains: Find the Subdomains section, type in your subdomain name, and hit “Create.”
Your subdomain is now ready for action. You can install WordPress on it manually or use a tool like Softaculous.
Installing WordPress Locally
Building and Testing Without the World Watching
If you’re a developer or want to play around with WordPress without anyone else seeing, you can install it on your computer. Here are your options:
- Choose a Development Environment: For Windows, go with WAMP. For Mac, MAMP is your friend.
- Bring Your Website Online: Remember that your site will stay offline until you decide to transfer it to a live web server with a hosting plan.

Final Thoughts
Installing it doesn’t have to be a headache whether you’re new to WordPress or a seasoned pro. Choose the method that suits you best, and remember – the WordPress installation process is designed to be quick and easy, so you can focus on what really matters: creating a fantastic website that your visitors will love.


Discussion about this post